Feeds:
Posts
Comments

Posts Tagged ‘Sweets’

Happy Saturday!  This week ran completely away from me  and  the next thing I knew it was Thursday … and then Friday … and then …  well today.  I thought I’d better check in with you. You know, in case maybe you missed your weekly dose of flour and sugar. Never fear,  I’m here with plenty of sweetness to go around. I just couldn’t keep all this loveliness to myself, so I’m here to share with you a little sweetness and some serious excitement.

I’ve been finding it hard to focus on anything except these cupcakes.  Aren’t they pretty.  This week I was working on these cupcake samples for a client who is getting married in July. She has a vintage theme and wanted a buttercream swirl with a simple gumpaste flower on top.  I made a variety of gumpaste flower colours so that she could choose which shade she wanted to use for her special day.

 As I was picturing the cupcakes, I couldn’t help but think how they were the perfect cupcake for Mother’s Day.

Swirls of delicious frosting sitting on light vanilla cupcakes.  Just a perfect marriage of cake, frosting and vanilla.  Sometimes you just have to have plain old vanilla to appreciate just how good it is.  Sometimes and I’m just saying, sometimes, it’s hard to find a cupcake that tastes as good as it looks when it’s just vanilla, vanilla.  Sometimes they just look better than they actually taste. These cupcakes however, are different.  You have my word, and I’ll even go so far as to say they taste … E.V.E.N. better than they look.  How’s that for creating some excitment.

Can I tell you a secret? Vanilla, vanilla cupcakes aren’t the only thing that’s got me excited these days.

An opportunity to intern at the Bonnie Gordon College of Confectionary Arts has me excited.  Over the moon actually.

Bonnie Gordon is cake designer/teacher,  extraordinaire and she started a college in Toronto in 2010 to share her wealth of knowledge and passion for meticulous cake design with others. Bonnie is a leader in the field of cake design education and she has a passion to nuture creative talent in her students. Ever since I started decorating cakes (which was just last year but it seems much longer somehow) I’ve wanted to go there.  I’ve  spent countless hours on the website, I’ve filled out the application to attend, at least 3 times, I attended their cake show in 2011 and I’ve even met Bonnie,  but in the end, circumstances just never made it possible to actually take classes there.  But all that is about to change because as of tomorrow, I will be there every Sunday for the next 4 months.  My job will be to assist the instructors, help set up the classroom, assist the students and tidy up when we’re done.  All the while, I will be listening to every little morsel of  cake decorating genius from some of the best instructors in the country.

I will be a sponge and just soak it all up.


I couldn’t have asked for a more incredible Mother’s Day gift and in this recipe, I couldn’t have asked for a more delicious cupcake. This is seriously one of the best vanilla cupcake recipes I have made, and believe me, I’ve made plenty.  The really fantastical thing about this recipe is that I came across it on the extraordinary baking blog by Rosie Alyea, called Sweetapolita.  Rosie makes the most gorgeous, delicious and mouth-watering cakes and treats you’ve ever laid eyes on and believe it or not she learned and perfected a lot of her baking skills at Bonnie Gordon College. That’s all the proof I need to know that this is a going to be a good thing.

No ones needs a holiday to send someone special wishes, but in honour of all you wonderful mothers I’m sending you buttercream wishes and sweet vanilla kisses for a wonderful Mother’s Day.

Happy Mother’s Day Mom

XXOO


Vanilla, Vanilla Cupcakes

Yields 2 1/2 dozen cupcakes

Ingredients

1 3/4 cups cake flour, not self-rising

1 1/4 cups all-purpose flour

2 cups sugar

1 tablespoon baking powder

3/4 teaspoon salt

1 cup (2 sticks) unsalted butter cut into 1-inch cubes, room temperature

4 large eggs, at room temperature

1 cup whole milk, room temperature

1 teaspoon pure vanilla extract

Method

1. Preheat oven to 325 (170 degrees C) degrees F. Line standard cupcake pans with your favourite paper cupcake liners and set aside.

2. In the bowl of an electric mixer fitted with the paddle attachment, combine dry ingredients (flours, sugar, baking powder, and salt) and mix on low-speed until blended.  Add cubes of butter, one at a time, and mix again until all of the butter is coated with flour.

3. Add eggs, one at a time, and blend until incorporated.

4. In a large glass measuring cup, whisk together milk and vanilla.  With mixer on medium speed, add wet ingredients in 3 parts, scraping down the sides of the bowl with a spatula after each addition.  Beat until just incorporated (it’s best not to overbeat).

5. Divide batter evenly among the liners filling about 2/3 full).  Bake until a toothpick in the center comes out clean, about 17 -20 minutes (for me it was 17).

6. Remove from the oven and immediately transfer the cupcakes onto a cooling rack by inverting the tray. Carefully turn the cupcakes right-side-up and let cool completely before frosting. use a small offset spatula to frost tops of each cupcake or pipe on icing using a 12-inch Wilton piping bag fitted with a  ……… tip. Decorate with flowers or sprinkles if desired.  Serve at room temperature.

Adapted from Billy’s Bakery Vanilla, Vanilla Cupcakes via Sweetapolita & Martha Stewart

Notes:

They’re easy to make and the batter bakes up light and moist as long as they’re not over baked.  I took mine out of the oven at 17 minutes.  At 15 minutes, the toothpick came out covered in batter, at 17 minutes, they were done.  So really keep an eye on them after 15 minutes. Mine were ready when they had just a touch of golden colour around the outside.

Vanilla Buttercream

Makes about 2 cups

Ingredients

5 egg whites

1 cup sugar

slightest pinch of salt

1 cup butter, room temperature, cut into pieces*.

* I know all recipes call for unsalted butter here but I tend to use what I have on hand and more often than not, it’s salted, so to compensate, I leave out the salt in the recipe or add  just the slightest pinch, if necessary.

Method

1. Whisk the egg whites, sugar and (salt if adding) in a heat proof bowl set over a saucepan of salted water (do not let the bowl touch the water) until the mixture is warm and the sugar dissolves.  Remove the bowl from the pan; let cool slightly.

2. Beat the egg white mixture in a stand mixer fitted with the whisk attachment (or with a hand mixer) on medium-high speed until stiff peaks form, 12 -15 minutes. Beat in the butter a few pieces at a time, then continue beating until smooth.  (Don’t worry if the mixture looks separated at first – it will come together as you keep beating.)

Read Full Post »

At some point in our lives we’ll all take a phone call, where immediately we can tell that something is wrong.  It’s either because it’s from someone we don’t usually hear from or there’s a detectable strain in the person’s voice.  Immediately we hold our breath and pray that everything is okay. Last week, I had one of those phone calls.

My mom and my cousin who live in Newfoundland, had been travelling on the highway and had been in a car accident.  One that could have quite easily, been much more devastating than it was. While slowed to turn, a truck carrying a full load of jet fuel could not slow down and in order to avoid hitting them, veered around them on the right shoulder.  While doing this he collided with their right back bumper and pushed them across the highway and onto the opposite shoulder. Thankfully there was no other traffic and each vehicle was able to stop before hitting the guard rail, which was by this point a barrier between the highway and the water below.

At times like this you stop to take stock of the situation and you get a sense that, “if this” or “if that” had happened, the outcome could have been much worse. Which makes you grateful that things turned out the way they did.

This got me thinking about my mom and all of the things she’s accomplished over the years.  When we were growing up as kids she worked in The Kitchen’s of Sara Lee.  I remember as a kid how she would cook, clean and bake all day before heading out for her shift in the afternoon.  She always wanted to have food ready for us kids when we came home from school and she couldn’t be there.

One of the things she often made were marshmallow squares.  The crust was always thick, buttery and flaky and I remember it often crumbled when you bit into it. The marshmallow was super thick, twice as thick as mine (so I think she must have used a 9″ x 9″ pan whereas, I’ve used a 9″ x 13″) and the palest pink.  Often they were cut into squares, rolled in fine white coconut and placed out on a sheet of waxed paper in a square Tupperware container. When we came home, all we had to do was peel back that lid and bite into the sticky sweetness.

These squares go way back to my grandmother’s era when gelatin desserts were all the rage.  The ingredients are simple, right down to the nostalgic Club House food colouring. Not wanting to bother mom for the recipe, I  once again thumbed through my Anglican Church Ladies cookbook and found a recipe for Marshmallow Squares and immediately knew I would make these in honour of my mom. I don’t ever remember cherries in them but this particular recipe suggested them, and since my husband loves cherries, I thought that would be the way to go.

Working from memory, I don’t think these squares are exactly like mom’s — they seem somewhat sweeter than I remember but everyone enjoyed them because of course, my family’s fond of sweet.  The addition of cherries adds a second level of sweetness so I took it easy on the coconut, just sprinkling some on the top instead of rolling each side in it. I think the next time I make them, I may experiment and reduce the sugar slightly, leave out the cherries and roll them in coconut to see if I can match my childhood memories.  Or I may even give mom a call and see if she still has her old recipe 😉

Old Fashioned Coconut Marshmallow Squares

Base:

3/4 cup butter

1/3 cup brown sugar

1-1/2 cups flour

1/4 tsp. salt

Mix together and press into a 9″ x 13″ pan.  Bake for 20 minutes at 325 degrees F.

Topping:

2 tbsp. unflavoured gelatin

1/2 cup cold water

2 cups white sugar

1/2 cup hot water

1/2 cup red cherries, chopped, optional

1/2 tsp. almond flavouring, optional

1 tsp. Club House red food colouring (any brand of liquid colouring will do)

1/4 cup fine coconut

Method:

Sprinkle gelatin over cold water and let stand to soften.

In a saucepan, put sugar and hot water to boil for 2 minutes over high heat. Remove from heat and add gelatin mixture to the hot syrup.  Stir until dissolved.  Beat in electric mixer until thick and stiff. Fold in cherries, flavouring, and food colouring.  Spoon mixture over shortbread and smooth out with a spatula.  You can dip your spatula in hot water if the marshmallow is sticking.

Cool several hours at room temperature until firm.  Cut into squares and sprinkle with, or roll in, coconut. Store in a airtight container.

Makes 1-1/2 dozen squares

Note:  These square would be beautiful cut small and served at a shower.

Read Full Post »

There’s a page in my cookbook that’s tattered and torn, grease stained and smeared with chocolate.  There are notes and exclamation marks in the margins, a few things crossed out here and there and some new additions penciled in.  It’s the most worn out page in my “Best Recipes This Side of Heaven” Home-Tested Recipes from Anglican Church Ladies, cookbook.  The cookbook itself is in poor condition.  The pages are dog-eared and stained, the back cover is ripped in half, the front cover is worn, creased and faded and little sticky tabs pop out on every side.  It was given to me by my husband’s aunt Mary in 1989, and reminds me fondly of her. For many years it was my most thumbed-through cookbook and as a new mom, helped me get a tasty, if not well-balanced meal on the table.  Never underestimate the culinary power of a home-tested church-lady recipe.  It can bring you fame, if only at your own kitchen table.

There must be a gazillion brownie recipes of various methods and ingredients and everyone seems to have their own personal favourite.  Brownies are like perfume or cologne ~ you have to find the one that suits you.  I’ve found one that suits me … perfectly. The surprising thing is, that it isn’t the one that’s all smeared and stained in my Anglican church ladies cookbook.  It’s new.

But these brownies, are officially my new:

sit-on-the-counter –

I-love-you –

I-have-to-have-chocolate –

let-me-comfort-you –

the-world-is-a-wonderful-place –

 brownies

Do you want to know a secret about this recipe?  It’s been directly above the one I’ve been using for the last 25 years.  Sitting there all the time.

The one I’d never tried and it took all these years to find. 

And do you know what my kids said when I asked them how they compared to the ones I had made them for the last quarter century.

“Oh, yeah, these are way better! 

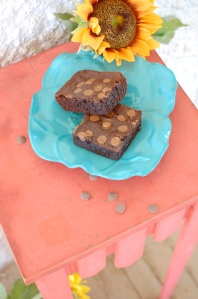
There’s something about brownies that make everything better and these brownies are no exception.  Fudgy, moist and full of satisfying chocolate flavour, they rival my oldest tried and true go-to-brownie recipe.

Wonderful Brownies

2 cups sugar

1 cup vegetable oil

4 large eggs

 1-1/2 cups flour

10 tablespoons cocoa

1 teaspoon salt

2 teaspoons vanilla

milk chocolate/semi-sweet chocolate chips or slivered almonds, optional, to sprinkle on top

1. Preheat oven to 325 degrees. Spray a 9″ x 13″ pan with cooking spray and set aside.

2. In a large mixing bowl, stir together the sugar, oil, eggs and vanilla.  In a separate medium bowl, whisk together the flour, cocoa, and salt. Add the dry ingredients to the wet ingredients and mix until incorporated.  Pour into your prepared pan and spread evenly.  Sprinkle with optional chocolate chips and/or nuts.  Bake for 25 minutes.  Remove pan to a rack to cool completely. Cut into squares and serve.

Source:  Best Recipes This Side of Heaven, St. Andrew’s church lady in Sidney, B.C.


Read Full Post »

Older Posts »