Feeds:
Posts
Comments

Posts Tagged ‘Lemon’

Last we spoke, I told you I was making Rhubarb Honey Yogurt Scones and I told you I’d let you know how they turned out. 

They turned out heavenly.

I wasn’t really trying to keep all of this goodness to myself.  Really, I wasn’t.

I just happened to get busy baking cakes for a few friends and neighbours celebrating birthdays and anniversaries and such.

Oh, and maybe a wedding. Or two.

So I haven’t been able to share these with you until now. But truth be told, they’re worth every minute you’ve waited.

These scones are magically light and fluffy with a zesty sweetness of jammed rhubarb and candied lemons balanced out with a little drizzled honey and a sprinkle of rosemary. 

They bake up tender and biscuit-like, but have the texture of a typical scone and I just love how rustic they look, once baked. 

They’re best served slightly warm and taste just as good without butter or preserves as they do with them.

This is the yogurt and honey dough with the jammed rhubarb folded in.

Gorgeous.

The dough is gathered into a ball on a floured surface, cut into 8 wedges and sprinkled with candied lemon zest and chopped rosemary.

I adapted these scones from a recipe by Joy the Baker for Grapefruit Honey Yogurt Scones, which you can find here

I used Joy’s idea for grapefruit and switched it out with the rhubarb, lemon, and rosemary,which may sound strange, but it really, really, works so you’re just going to have to trust me on this one.

Besides, my middle name is Joy, so you never know, we just may be kindred spirits when it comes to scone flavour combinations.

Rhubarb Honey Yogurt Scones with Lemon and Rosemary

Makes: 8 Scones

1 1/2 cups all-purpose flour

1/4 cup sugar plus 1 tablespoon sugar

2 tablespoons honey plus more for drizzling

1 teaspoon baking powder

1/2 teaspoon baking soda

1/4 teaspoon salt

6 tablespoons unsalted butter, cold

1 cup rhubarb, chopped

2 tablespoons brown sugar

1/2 cup plain yogurt

few sprigs of fresh rosemary, chopped fine

Method:

1. Preheat oven to 400 degrees F. Line a baking sheet with parchment paper and set aside.

2. In a medium pot, simmer rhubarb with brown sugar until it thickens into a jam. Set aside.

3. Zest the lemon and rub together with the tablespoon of sugar and set aside.

4. Dice cold butter into small chunks and add to the dry ingredients.  Using a pastry mixer or your fingers and working quickly, break the butter down into the flour mixture until the butter chunks are the size of small peas.  Add the honey, plain yogurt.  Toss together lightly with a fork until all of the dry ingredients are moistened by the yogurt and honey.

5. Next add the jammed rhubarb and fold gently.

6. Turn the scone dough out onto a lightly floured surface.  Form into an 8 inch circle, about 1 inch thick. Use a knife or a bench scraper to cut the dough into eight scone triangles.  Place the triangles on the prepared baking sheet.  Generously sprinkle the tops of the scones with the candied lemon zest and chopped rosemary.

7.  Bake for 15 minutes, until slightly gold brown on top and firm but soft in the center.  Drizzle each scone with honey and allow to cool on the pan for 10 minutes before serving.  Serve warm with butter or jam.  These scones are best served the day they’re made.

Read Full Post »

Happy May days!  Don’t you just love May. With all my chatter about cookbooks, (see this post), I wanted to share with you another priceless volume that I have in my rather extensive collection. Yes, it’s true, I cannot deny that I am somewhat of a cookbook, lets say, “collector”. I browse them like magazines and read them like, well … novels.  They make up a great deal of my reading pleasure and a large percentage of my limited weight allotment when travelling. Truth be told, I have a cookbook bag in my bedroom and at the first sign of a road trip, I excitedly carry it out to the car. With my shelves burgeoning from the weight and at the risk of giving in to this small obsession of mine, these days it takes the will of a lion to steer myself clear of cookbook displays, as I vow to cook and bake my way through the ones I already have before purchasing any new editions. Fingers crossed.

In December of 1999, my husband’s youngest sister, Lynda rolled up her sleeves and took on the monumental task of assembling a family cookbook to usher in the new millennium. For Christmas, she presented each of us with a bright yellow spiral bound collection of our family’s favourite recipes, some of which have been passed down through the last century and some which are new additions, donated by some of the newer members of the family (Hmm, hmm, yours truly being one of them). There may be others, but I know for sure, that this book is a family treasure and a kitchen fixture in our home as well as the homes of my 3 sister-in-laws and my husband’s mom.

Because my mother-in-law is one of those magical bakers (not to mention cook) where everything she serves tastes like a slice of heaven, and many of the recipes she uses came from her mother, you can imagine how exciting it was to receive it;  all of our favourite recipes bound up in a single spiral.  Many of the recipes I use on a daily basis, (including this particular recipe for Lemon Poppy Seed Muffins), come from the pages of this book.

Around here, muffins are always in demand because they’re so versatile; they taste great, pack well and don’t take long to bake.  For a family always on-the-go, a batch of muffins first thing in the morning never goes astray, as they thankfully satisfy the seemingly endless appetites of working men, boys who play sports and friends who drop by.

Scratch muffins are the kind I like to make as they are often chock full of good things like fruits and vegetables. The great thing about muffins is that you can take a recipe and change it up, swap out the flour or the fruit to suit your individual tastes and make it your own. In the same way, this recipe for Lemon Poppy Seed Muffins, may taste great as Orange Poppy Seed Muffins by switching the lemon juice and lemon zest for orange juice and orange zest. I personally like to experiment with the flavours but haven’t yet tried this combination yet. If you happen to give it a try, I’d love to hear about it.

This recipe comes from my husband’s mom, baker extraordinaire. It’s light and delightful and the poppy seeds provide a surprising layer of crunchy texture.  Though they do have quite a bit of sugar to balance the tartness of the lemons, they do not have a lot of fat, just a mere 1/4 cup of melted butter, balanced with the goodness of two freshly squeezed lemons and 1 and 1/4 cups of dairy fresh milk, so I feel good about serving them up, even for breakfast.

These muffins would make a great addition to a Mother’s Day brunch. They’re also a quick way to start the day if you happen to be travelling; pack a few for a great snack if you’ll be on the road for a while. You may want to whip them up to brighten someone’s day or show mom just how much you love her.

 Adapted from Our Family Recipes

Lemon Poppy Seed Muffins

Ingredients:

2 lemons

1 1/4 cups granulated sugar

3 cups all-purpose flour

3 teaspoons baking powder

1 teaspoon baking soda

1/2 teaspoon salt

3 tablespoons poppy seeds

1 egg

1 1/4 cups milk

1/4 cup melted butter

Method:

1. Preheat oven to 350 degrees F. Grease 12 muffin cups or line with paper cups.  Finely grate peel from lemons.  Mix half of the peel with 2 tablespoons of the sugar and set aside to sprinkle over the muffins before baking.  Squeeze juice from lemons. Measure out 1/3 cup juice and stir in remaining peel.

2. Using a fork, stir flour with remaining sugar, and the rest of the dry ingredients.  Whisk egg in a small bowl.  Then whisk in the milk, lemon juice and butter.  Milk may curdle when mixed with lemon juice.  Immediately stir egg mixture into flour mixture just until combined.  Spoon into muffin cups.  Sprinkle tops with lemon-sugar mixture.  Bake for 20-22 minutes.

Makes 1 dozen muffins.

Notes:

For a light lemony crumb, I baked mine for 20 minutes.

You can omit the lemon zest/sugar topping if serving to young kids.

Read Full Post »

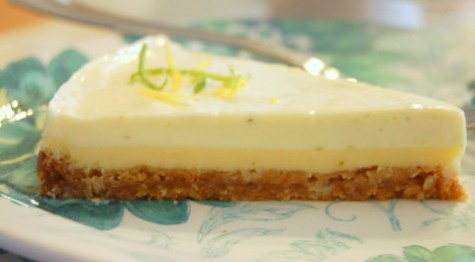
Just like hay and sunshine, lemons and limes are just meant to go together. Singularly they’re very good, but together they’re intense. A combination of  lemons and limes makes the most glorious, tart, refreshing flavour explosion I can think of.  This recipe takes these glorious flavours and turns them into a luscious, creamy, beautiful and luxurious dessert.  The combination of the graham cracker, coconut crust is warm and delicious, the layer of lemon is sweet and heavenly, the topping of fresh lime is rich and creamy.  All 3 of  these layers combine to provide an absolutely luscious dessert that will impress your most discerning of guests.   

Lemon Lime Tart

1/2 cup (125 ml) lemon juice, strained

3 eggs

1 can (300 ml) sweetened condensed milk

1 tsp (5 ml) vanilla

2 limes

8 oz. (227 g) cream cheese, softened

2 tablespoons (30 ml) granulated sugar

Coconut Graham Crust

1 cup (250 ml) graham cracker crumbs

1/2 cup (125 ml) unsweetened desiccated coconut

3 tablespoons (45 ml) unsalted butter, softened

2 tablespoons (30 ml) sugar

1 pinch salt

1. In a large bowl and using fingertips, crumble graham cracker crumbs, coconut, butter, sugar and salt.  Press into parchment-paper-lined 9-inch   springform pan.

2. Bake in 350 °F ( 180 °C) oven until golden brown, 10-12 minutes. Let cool completely. This can be made ahead and stored, covered in the refrigerator for up to 48 hours.

Lemon Filling

While your crust is cooling, prepare the lemon filling.  In another large bowl, whisk together lemon juice, eggs, 2/3 cup ( 150 ml) of the condensed milk and half of the vanilla; pour over the cooled crust.  Bake in 350 °F (180°C) oven until set, 20-25 minutes.  Let cool completely. 

Lime Topping

1. Zest one of the limes to make 1 tablespoon of zest.  Squeeze and strain both limes to make 1/3 cup (75 ml) juice.

2. In a food processor, pulse cream cheese, remaining condensed milk and vanilla, lime zest, (strained) lime juice and 2 tablespoons (50 ml) sugar until smooth.  Pour over baked layer.  Refrigerate until set, about 8 hours. 

If you’re like me and find it difficult to wait 8 hours before you can sink your fork into all this goodness, plan ahead and make sure you’re distracted or at the very least, getting a good night’s sleep while it sets, however I’ll just warn you … the anticipation may make it difficult.

Notes

When you’re ready to remove the tart from the spring-form pan be sure to dip a knife in hot water and run it around the inside edge of the pan before you decide to release the clip. This will help ensure you have a clean edge without any large cracks or tears.  If you do have a rough edge just dip your knife in some hot water and use it to smooth out the tear.  Use this method again witha larger knife when you go to cut and serve the tart.  A sharp, hot knife will give you a nice, clean edge and prevent your knife from gumming up so that your servings look neat and tidy.  Or if you’re not trying to impress and you just can’t wait one more minute, cut, serve and experience a little taste of heaven. The entire dessert can be made ahead, covered without touching the top layer, and stored in the fridge.  Top with a little lemon and lime zest and you will have the most delicious dessert you’ve had  in a long time.

Source: Canadian Living 

Serves 12 wonderful people, family and friends 


Read Full Post »

Older Posts »