Feeds:
Posts
Comments

Posts Tagged ‘dessert’

Surprised?

I’ll bet you didn’t expect to hear from me this soon.

I’m making up for lost time.

If that’s even possible.

But I’m determined to try, so you can expect to hear a lot more from me this week as I try to fill these pages with some of the most delicious home baking and cooking recipes I’ve made while I was away.

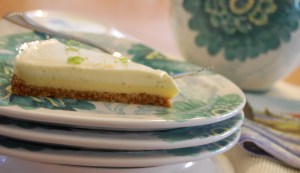
Yes, even though I wasn’t here, I was still heating up the oven and cleaning up the mess.  Our plates were pretty and our tummies were full. Too full, sometimes.  Good food is hard to resist.  Like this blueberry apple cream cheese pie for instance.

It’s a pie I made a while back that I’ve been wanting to share.  It’s scrumptious. Apples and blueberries are covered in a luscious thick layer of cream cheese topping and  a sprinkle of walnuts.  It really is as good as it looks and it takes the humble pie to soaring heights of deliciousness.

Because I love to use fresh, seasonal fruit whenever I bake, Thanksgiving makes the perfect holiday to pass this around the family table, but you really can make and share it any time of the year and you’ll be sure to get some ooohh’s and awwwh’s.

Sprinkled with your favourite nuts, the rich and creamy, cream cheese topping nestles right into the tart apples and sweet blueberries for a beautiful, dramatic and rustic presentation that will impress even your most discerning of guests.

Cream Cheese Apple Blueberry Pie

Adapted from Pillsbury Kitchens’ Family Cookbook

Serves 10

Ingredients

Your favourite single-crust pastry

Apple Filling

6 cups (6 medium) peeled, sliced apples

1 cup fresh blueberries

1 cup brown sugar

1/3 cup all-purpose flour

2 teaspoons grated lemon zest

2 tablespoons lemon juice

Cream Cheese Topping

8-ounce package cream cheese, room temperature

1/3 cup granulated sugar

1 egg

1/3 cup chopped nuts (I used walnuts, but feel free to use your favourite)

Method

1. Heat oven to 375 degrees F.

2. In a large bowl, combine apples, blueberries, sugar, flour, lemon zest and lemon juice. Toss lightly.

3. Spoon into your prepared pastry-lined pie pan.

4. Combine all cream cheese topping ingredients except the nuts and beat until smooth.

5. Spoon cream cheese topping over the apples and blueberries.  Sprinkle with nuts. Bake at 375 degrees F for 30 to 35 minutes or until lightly browned.  Refrigerate any leftovers.

Note: There is a caramel sauce option for this pie that I didn’t try; but it does sound delicious so I’m adding it, just in case you’d like to give it a try.

For this caramel version, omit the blueberries, using just the apples, and make a caramel sauce that gets poured over the apples just before you add the cream cheese topping.

Caramel Sauce

8-ounces (about 28) of caramels

1/2 cup half-and-half or evaporated milk

In a small saucepan, melt caramels in half-and-half on low heat, stirring occasionally, until smooth.  While warm, drizzle over the apples before adding the cream cheese topping.


Read Full Post »

One of my favourite things to make around the holidays is a pavlova.   A pavlova is a round, pie shaped meringue, filled with curd or custard and topped with cream and fruit.  It’s positively delicious.  Last year I made one my mother-in-law loves to make, called angel pie.  It’s a white meringue, filled with lemon filling and topped with whipped cream and fresh fruit.  I’m sure it’s called angel pie because it tastes so heavenly.

Looking for holiday dessert ideas, I was flipping through a 2010 Food & Drink Magazine from the LCBO, when I saw a recipe for individual meringues filled with blackberry jam and whipped cream. I  just knew I’d have to try them.

The meringues are quite sweet, with a crispy outer shell, and a nice and chewy marshmallow texture on the inside.  In this desert, the sugary sweetness of the meringue, is balanced by the whipped cream and little pockets of blackberry jam filling.  The burst of fresh blackberry on the top, cuts through the cream and meringue and cleanses your palette, for a nice clean finish.  


The result is a really delicious and satisfying desert that may seem simple, but really delivers through layers of tastes and textures. You have the outer crunchy shell of the meringue, followed by a soft chewiness of the centre, filled with a smooth whipped cream flavoured with vanilla, that’s complimented by ribbons of blackberry preserves, and topped with a luscious berry bursting with natural juice and sweetness.  

The recipe originally called for bits of white chocolate and vanilla in the meringue but when I added them, the meringue lost it’s thickness and I ended up with meringue puddles when I piped it onto the parchment. So I started over with just a plain meringue, of egg whites, sugar and cream of tartar.  Once I did that, I was able to pipe the little nests without any trouble at all and they stayed up nice and high so that the filling could easily nestle inside, with the jam.


The trick to these meringues is to keep the jam and whipped cream separate until they are being piped into the meringue.  That way you get layers and pockets of jam, instead of a uniform purple blackberry cream, which is fine too, but if you want the two-tone texture you see in my photos, you don’t want to over mix them.  A fold or two, before filling the pastry bag should be enough.  And remember, once the blackberry jam and whipped cream are pushed through the pastry bag in order to fill the nests, they will mix together  even more. 


 Blackberry Meringues

Ingredients

3 large egg whites, room temperature

1/4 tsp (50 ml) cream of tartar

3/4 cup (150 ml) of superfine sugar

1 cup (250 ml) whipping cream

1 tsp (5 ml) vanilla

1/4 cup (50 ml) blackberry preserves, I used Smucker’s with good results

Method

1. Preheat oven to 200 °F (105 °C).  Line a baking sheet with parchment paper.  Set aside.  

2.  In a large, especially clean bowl, use an electric mixer to beat whites on low-speed, until foamy.  As the whites begin to whiten and foam, add the cream of tartar and beat on medium high-speed until soft peaks form.  Add the superfine sugar, also commonly referred to as castor sugar by the spoonful (I used  Instant Dissolving Sugar, by Redpath, because it was the only superfine sugar I could find, and it dissolves instantly when added to moisture.  Instant Dissolving Sugar by Redpath, used to be called, Fruit Powder Sugar). Beat well after each addition until all of the sugar has been incorporated, the whites are stiff and glossy and when you press a bit of the mixture between your thumb and index finger it doesn’t feel gritty, about 6 minutes.

 3. Spoon half the mixture into a piping bag (I used a Wilton 14″ Piping Bag ) fitted with a swirl piping tip (I used Wilton tip #1M).  If you don’t have a pastry bag you can make one by cutting a corner off of a large plastic ziplock bag. Pipe the mixture into a 1-inch (2.5cm) rosettes, in rows onto the prepared baking sheet, leaving a “nest” in the center of each.  Bake in the preheated oven for 50 minutes to 1 hour (the time will vary depending on the humidity of the environment), until they are crisp and dry.  Turn off the oven and leave the door ajar until the oven and meringues are completely cool (they are best if left overnight).

 Making the Meringue Nests

4.  In a bowl, beat the whipping cream with a whisk or mixer until you see soft peaks begin to form.  Add vanilla and sugar and beat again until incorporated and soft peaks are formed.  Gently fold in the blackberry preserves with a spatula (being careful not to overmix) and fill a pastry bag fitted with a Wilton tip #2A, half full. If you don’t have this tip you can use the piping bag without it, just as well. Pipe the blackberry cream into cooled meringue nests just before serving.  Garnish each meringue with a blackberry and serve immediately.

This recipe is very versatile.  You can replace the berries and jam with one of your favourite flavours. I think it would be absolutely gorgeous and delicious with strawberries, raspberries, or even peaches. You may want to keep the recipe handy as summer fruits begin to ripen and flavours peak,  your family and friends will be delighted.

Good luck & enjoy!

Read Full Post »

Just like hay and sunshine, lemons and limes are just meant to go together. Singularly they’re very good, but together they’re intense. A combination of  lemons and limes makes the most glorious, tart, refreshing flavour explosion I can think of.  This recipe takes these glorious flavours and turns them into a luscious, creamy, beautiful and luxurious dessert.  The combination of the graham cracker, coconut crust is warm and delicious, the layer of lemon is sweet and heavenly, the topping of fresh lime is rich and creamy.  All 3 of  these layers combine to provide an absolutely luscious dessert that will impress your most discerning of guests.   

Lemon Lime Tart

1/2 cup (125 ml) lemon juice, strained

3 eggs

1 can (300 ml) sweetened condensed milk

1 tsp (5 ml) vanilla

2 limes

8 oz. (227 g) cream cheese, softened

2 tablespoons (30 ml) granulated sugar

Coconut Graham Crust

1 cup (250 ml) graham cracker crumbs

1/2 cup (125 ml) unsweetened desiccated coconut

3 tablespoons (45 ml) unsalted butter, softened

2 tablespoons (30 ml) sugar

1 pinch salt

1. In a large bowl and using fingertips, crumble graham cracker crumbs, coconut, butter, sugar and salt.  Press into parchment-paper-lined 9-inch   springform pan.

2. Bake in 350 °F ( 180 °C) oven until golden brown, 10-12 minutes. Let cool completely. This can be made ahead and stored, covered in the refrigerator for up to 48 hours.

Lemon Filling

While your crust is cooling, prepare the lemon filling.  In another large bowl, whisk together lemon juice, eggs, 2/3 cup ( 150 ml) of the condensed milk and half of the vanilla; pour over the cooled crust.  Bake in 350 °F (180°C) oven until set, 20-25 minutes.  Let cool completely. 

Lime Topping

1. Zest one of the limes to make 1 tablespoon of zest.  Squeeze and strain both limes to make 1/3 cup (75 ml) juice.

2. In a food processor, pulse cream cheese, remaining condensed milk and vanilla, lime zest, (strained) lime juice and 2 tablespoons (50 ml) sugar until smooth.  Pour over baked layer.  Refrigerate until set, about 8 hours. 

If you’re like me and find it difficult to wait 8 hours before you can sink your fork into all this goodness, plan ahead and make sure you’re distracted or at the very least, getting a good night’s sleep while it sets, however I’ll just warn you … the anticipation may make it difficult.

Notes

When you’re ready to remove the tart from the spring-form pan be sure to dip a knife in hot water and run it around the inside edge of the pan before you decide to release the clip. This will help ensure you have a clean edge without any large cracks or tears.  If you do have a rough edge just dip your knife in some hot water and use it to smooth out the tear.  Use this method again witha larger knife when you go to cut and serve the tart.  A sharp, hot knife will give you a nice, clean edge and prevent your knife from gumming up so that your servings look neat and tidy.  Or if you’re not trying to impress and you just can’t wait one more minute, cut, serve and experience a little taste of heaven. The entire dessert can be made ahead, covered without touching the top layer, and stored in the fridge.  Top with a little lemon and lime zest and you will have the most delicious dessert you’ve had  in a long time.

Source: Canadian Living 

Serves 12 wonderful people, family and friends 


Read Full Post »