Feeds:
Posts
Comments

Posts Tagged ‘Cookies’

I stumbled upon these cookies, quite by accident.  I was all set to make Ooey,

Gooey, Chewy, S’more Bars until I discovered that I was out of graham cracker

crumbs.  All I had were oreo cookie crumbs.  Hhhm. After a second look at the

ingredient list, I couldn’t see any reason why they wouldn’t work

with oreo cookie crumbs instead of graham cracker crumbs.  Maybe they

would make chocolate S’mores. Sounded good to me and good they

were.  Everyone went crazy for them!  My family downed these magical treats

faster than you can say chocolate S’more bars. They are exactly like the name

implies … they’re ooey, they’re gooey, they’re chewy, they’re chocolate S’more

bars and they’re really delicious. 

With the snow starting to fly here in Ontario, we’re always looking for heart

warming foods to serve our friends and families. Served slightly warm and

gooey, with steaming cups of hot chocolate, these bars can really warm things

up after a game of sport.   Whether it’s hockey, tobogganing, ice skating or a

giant family snowball fight, take the mitts off this winter and serve up a batch

of these satisfying bars.  You’ll be amazed at just how fast they’ll disappear. 

Ooey, Gooey, Chocolate S’more Bars

Prep:  25 minutes

Oven:  350° F

Bake:  35 minutes

Ingredients

3/4 cup (175 ml) butter, softened

1/2 cup (125 ml) packed brown sugar

2 eggs

2 tsp. (10 ml) vanilla

 1 cup (250 ml) all-purpose flour

1 1/2 cups (375 ml) quick cook rolled oats

1 cup (250 ml) oreo cookie crumbs

2 1/2 (625 ml) cups tiny marshmallows

1 /2 cup (125 ml) milk chocolate chunks for baking

1/2 cup (125 ml) good white chocolate chunks for baking

Method

Preheat oven to 350 ° F ( 180°C). 

Line a 13x9x2-inch baking pan with foil, extending foil over the pan edges.  If

you’re having trouble getting the aluminum foil to line a pan smoothly you can

try flipping the pan over and shaping the foil around the outside of the pan,

extending it about 1 inch past all the edges.  Remove the oil, flip the pan

upright, and pop the foil lining in the pan.

Grease foil well, paying careful attention to the corners and set aside. 

In a large bowl, beat butter with an electric mixer on medium to high speed for 2 minutes. 

Beat in brown sugar until combined, scraping the bowl occasionally. 

Beat in eggs and vanilla until combined. 

Beat in flour. Stir in oats and oreo cookie crumbs.

Reserve 1 cup (250 ml) of the oat mixture.  Spread remaining oat mixture into

prepared pan.

TIP Use the back of a large spoon dipped in hot water to spread the oat

mixture in the pan.  It’s near impossible to spread any other way.

Bake in the preheated oven about 15 minutes or until lightly browned. 

Sprinkle marshmallows evenly over the warm crust.  Top with chocolate

chunks. 

Dot remaining oat mixture over chocolate and marshmallows. Bake bars

about 20 minutes more or until top is lightly browned. Cool completely in pan

on a wire rack.  Using the edges of the foil, lift the uncut bars out of the pan. 

Carefully peel back the foil while the cookies are still warm.  

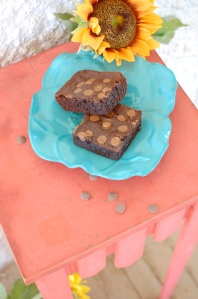
Cut into bars.  We cut 12 supersized bars ~ but you can also get 24 regular

sized bars. Delicious!

Place bars in an airtight container; cover.  Store at room temperature for up to 3 days or freeze for up to 3 months.

Adapted from Better Homes and Gardens Magazine of Christmas Cookies December 2009.

Be sure to let me know if you give these a try. I’d love to hear from you.

This Sweet Wife

Read Full Post »

For as long as I can remember I’ve enjoyed these crisp and chewy Rice Krispie Marshmallow Treats.  Growing up, my mom made them for me and I’ve been making them for my family for over 20 years.  They’re one of those treats that conjure up memories for childhood and fun.  They’re SO not serious or sophisticated, just simple and yummy. They can be dressed up or served simple.  Around here I usually keep them plain because that’s the way we love ’em.  They always go over well whenever there’s a crowd of teenagers around and my teenagers still enjoy them after all these years.

A pan doesn’t last long because they pass as a quick on-the-go breakfast … a mid-morning snack … a meal replacement … an afternoon snack … a meal replacement … no just kidding … I draw the line at having them for supper … though they are made from rice, aren’t they?  Hhmm.

We like our treats ooey and gooey, and made only with real butter. My kids have always asked me why my marshmallow treats always taste better than others they’ve tried and seriously, the only thing I can think of, is that I use real butter.  Other than that, I don’t really do anything extra special. Here’s the long version of making these simple treats.  They’re supposed to be one of the fastest cookies you can make but it’s probably my longest blog.  Just wanted to make sure you got them just right so I’ve included a pictorial! Hope you like it.

Rice Krispie Marshmallow Treats

1/2 cup (25 ml)  butter

1 teaspoon (5 ml) real vanilla

12 cups Rice Krispies cereal

16 cups (2 Qts.) marshmallows, either large or small will work.

This recipe fills a deep 9″ x 13″ glass baking dish and makes 20 large squares.

The first thing you want to do is melt your butter in a large pot.  Keep your heat adjusted to medium-low and stir.  You don’t want to burn all of that gorgeous butter~!  Once your butter is melted, add your vanilla.

Than add your marshmallows. Stir the marshmallows into the melted butter to coat them. At this point you’ll want to turn your heat down a little just to make sure your marshmallows don’t burn.

Keep stirring.

… and stirring …… and just for fun …  stir some more. See how the marshmallows are melting down.  We’re almost there.

Almost …

Hmmmm … okay, it’s really getting gooey now.

Look at that, we made it.  There’s only little bits of marshmallow left to melt so remove your pan from the heat and give it a couple more stirs and you’re ready for the Rice Krispies cereal.

Start dropping in your Rice Krispies cereal and stir. You’ve got to get them all coated with the marshmallow goo.

Stir, stir, and stir some more until they’re all coated. Believe me, it will be worth it. See all the lovely marshmallow goo covering the cereal.  The last thing you want is a dry batch of these because they become very hard and when you need to get out the butcher knife and heave with all your might on the handle to cut them, you know you’ve added too many krispies. Now go ahead and scoop out all that sweetness into a 9″ x 13″ glass baking dish. Coat your hands and fingers in a light film of butter and pat them down gently until they’re nice and even. A deep 9″ x 13″ pan holds a lot but I have 3 teenagers and a working man around the house … I need this size and then some.

So here they are, ooey, gooey Rice Krispie Marshmallow Treats.  They can be stored at room temperature for a couple of days covered in plastic wrap or an airtight container … if they last that long.

Good luck & enjoy!  I hope you stop by again soon!

This Sweet Wife

Read Full Post »

Farmland Flax Cookies

These cookies are perfect for when a packed lunch is in order and around here,

that’s actually more often than you’d think.   These cookies combine oatmeal,

which of course is a go-to ingredient for a lot of cookies, with a handful of

ground flax seeds.  It’s an interesting combination because the flax is

crunchy and the oatmeal is chewy.  You end up with a surprising nutty

flavour.  I knew I had a winner on my hands when my husband called from

the combine just to tell me how much he loved these cookies.  Let’s just say, 

that doesn’t happen often. 

I’d love to know if you have a favourite way to serve up flax in your diet?

Why eat flax?


Should I eat flax whole or grinding it up?


Want to add flax to your daily diet?


Canadian grown.

Adapted from Saskatchewan Flax Development Commission

Farmland Flax Cookies

1/2 cup (125 ml) butter

1/2 cup (125 ml) packed brown sugar

1/3 cup (75 ml) granulated sugar

1 egg

1/2 tsp (2 ml) vanilla

1 cup (250 ml) all-purpose flour

3/4 cup (175 ml) quick-cooking rolled oats

2/3 cup (150 ml) ground flax seeds

1 tsp (5 ml) baking soda

Method

1. Line baking sheets with parchment paper and set aside. 

2. In a bowl, beat together butter, brown and granulated sugars until light and

fluffy (approximately 8 minutes); beat in egg and vanilla.

3. In a separate bowl, whisk together flour, oats, ground flax seeds and baking

soda; stir into butter mixture to make a soft dough.  Wrap the dough in plastic

wrap and refrigerate for 10 -15 minutes.   

4. Drop by level tablespoonfuls (15 ml), 2 inches (5 cm) apart, on prepared

baking sheets.  Bake in a 350 ° F (180 °C) oven for about 8-10 minutes.   

5. Let the cookies cool in the pan, for 2 minutes before you transfer them to

the cooling rack directly.  Use a spatula with a thin, flexible blade to make the

transfer after 2-3 minutes. 

These cookies make a great addition to packed lunches for work,

school, picnics, tractors, combines or any other type of farm equipment. They

can be made ahead and layered between waxed paper in an airtight container

and stored at room temperature for up to 5 days. (I actually liked them better

the second day). They can also be frozen the same way for up to 1 month.

Makes 40 cookies. Enjoy and stay healthy!

 Love, This Sweet Wife

Read Full Post »

Older Posts »