Feeds:
Posts
Comments

Posts Tagged ‘Cinnamon’

1-DSC_1236

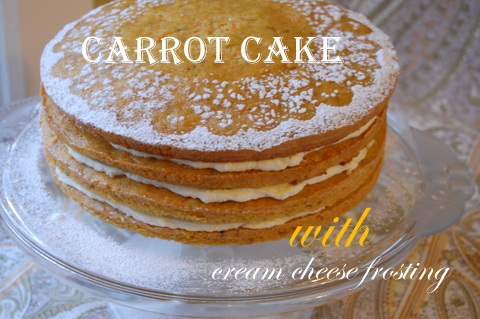
Happy Christmas everyone! I hope your holiday has been, and will continue to be filled with love, joy, family, friends and endless layers of sweetness like this fluffy carrot cake.

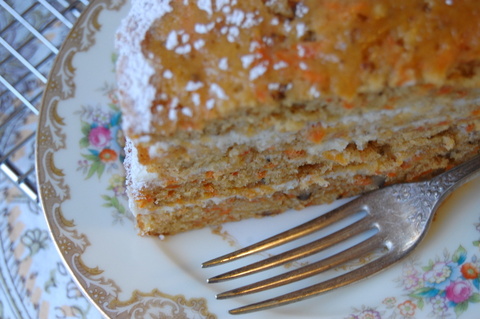
Carrot cake isn’t necessarily a conventional Christmas dessert, not like a steamed pudding or trifle anyway, but it does make a nice addition to the holiday feasting because it incorporates a lot of the foods we associate with the holidays.  The delicate layers of cake are full of sugar, spices, nuts, fruit and shredded carrots layered between thick, creamy cream cheese frosting for a smooth and satisfying finish to any holiday meal. It’s not overly sweet and can be a welcome change to some of the sweeter desserts being whipped up right now.

1-DSC_1291

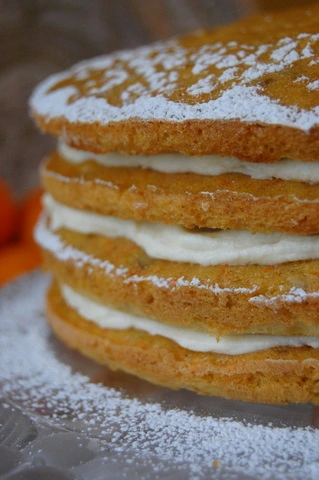
Though I usually wrap the whole cake in frosting, this time I wanted to cut back on the richness a little and thought I’d just layer the cake with frosting and top it off with a sprinkle of powdered sugar.  I placed a doilie upside down on top of the cake and sprinkled powdered sugar with a little sifter around the edges until the holes in the doilie were covered.  The result was a pretty outline of the doilie to decorate the cake, without the heaviness of a lot of cream cheese frosting. My family was delighted with the results as they raved about the rich and satisfying taste of the cake without some of the extra calories that usually come with a lot of frosting.

1-DSC_1299

Wrapped entirely in frosting or filled just between the layers, this carrot cake is a delicious way to entertain family or friends during the holiday season because the ingredients can be adjusted to suit your preferences by changing golden raisins for dried currants, shredded coconut (my personal favorite) or pineapple chunks.

My sincere best wishes for a wonderful year of sweetness and joy!

1-DSC_1301

Carrot Cake with Cream Cheese Frosting

Adapted from Vintage Cakes by Julie Richardson

Ingredients

1 cup all-purpose flour

1 cup whole wheat flour

1 1/2 teaspoons baking powder

1/2 teaspoon baking soda

1/2 teaspoon fine sea salt

1 teaspoon cinnamon

1 teaspoon ground ginger

1/4 teaspoon ground nutmeg

11/2 cups granulated sugar

1/2 cup firmly packed brown sugar

3/4 cup canola oil

4 eggs, at room temperature

1/2 cup buttermilk, at room temperature

1 pound peeled and coarsely grated carrots (approximately 3 cups)

1/2 cup chopped walnuts, untoasted

1/2 cup golden raisins

Method

1. Center an oven rack and preheat the oven to 350 degrees F.

2. Sift together the flours, baking powder, soda, salt, ginger, cinnamon, and nutmeg in a bowl, then whisk the mixture by hand to ensure that the ingredients are well mixed.

3. In the bowl of a stand mixer fitted with the paddle attachment, combine the sugars with the oil on low-speed until the mixture resembles wet sand. As you make the batter, stop the mixer frequently and scrape the paddle and the sides of the bowl with a rubber spatula. Add the eggs one at a time, adding the next one as soon as the previous one has disappeared into the batter. Increase the speed to medium-high and blend for 3 minutes.  The thick batter will increase in volume and lighten in color. With the mixer on low-speed, add the flour mixture in three parts, alternating with the buttermilk in two parts, beginning and ending with the flour. After each addition, mix until just barely blended and stop and scrape the bowl.  Stop the mixer before the last of the flour has been incorporated and complete the blending by hand with a rubber spatula to ensure you do not over-beat the batter. Fold in the carrots, golden raisins and the walnuts.

4. Divide the batter evenly between four prepared pans.  Place the pans in the center of the oven and bake until the cakes are golden and spring back when lightly touched in the middle, 20 to 25 minutes.

5. Promptly run a knife around the edge of the pan to help the cake retract evenly from the sides while cooling. Cool the cakes in their pans for 10-12 minutes, taking extra care as they are fragile and could crack. Leave them to cool on the rack, top side up, until they reach room temperature and you are ready to assemble the cake.

6. To assemble the cake, place one of the layers, top side up, on a serving plate. If the cake is domed in the middle you may need to use a serrated knife to trim off the domed area.  Using a metal spatula, spread one-third of the frosting over the cake, spreading it slightly to the edge. Place the next layer of cake, top side down, on top of the frosted layer, remembering to trim any excessive doming first, if necessary.  Repeat again, ending with the last layer placed top side up on the frosting. Place a doilie upside down on top the cake and press it down until it sticks slightly. Fill a small sifter with a tablespoon of powdered sugar, taping it gently with your hand over the edges of the doilie until you have gone all the way around.  Carefully remove the doilie by lifting it gently up and away from the cake and you should have a lovely decorative pattern that will last for several hours.  If left overnight the powdered sugar will be absorbed into the cake so if you are entertaining, it may be best to leave this part until just before your guests arrive.

Notes:

This cake is fabulous the day it’s made but can be kept fresh for up to 2 days in an airtight container in the refrigerator due to the frosting.  Allow at least 1 hour for the cake to come to room temperature before serving. I’ve also frozen this cake with great results. Just let it defrost at room temperature and serve.

Cream Cheese Frosting

Adapted from Food Network Website

Ingredients
8 oz. unsalted butter, softened (I used salted butter and it was just as good)
8 oz. cream cheese, softened
4 cups powdered sugar (confectioner’s)
2 teaspoon vanilla extract
Method
1. In a large bowl, beat together the butter and cream cheese with an electric mixer.  With the mixer on low-speed, add the powdered sugar a cup at a time until smooth and creamy.  Beat in the vanilla extract.

Read Full Post »

Hi there!

I’ve decided that I’m just going to start where I left off. And that’s with these autumn apple cheddar squares.

I made them in September when people were driving to the country to pick apples on Sunday afternoons, kids were back in school, and us mom’s were trying to come up with new lunch box or after-school snack ideas.

These squares remind me of something my mom used to make … date squares.  Remember those? But instead of dates, the filling is made with apples, a touch of cinnamon, brown sugar and some old cheddar cheese.Yes that’s right.  Cheddar.  As in orange cheese.

Growing up, I remember seeing apple pie served with slices of cheddar cheese and often wondering just what the cheese doing there because, after-all, pie was dessert and well, cheese just wasn’t.

Well, now that I’ve tried these squares, I know that apples, cinnamon and cheese belong together.

Cheddar Apple Squares

Adapted from one of my favourite cookbooks: The Complete Canadian Living Baking Book

Makes 20 squares

Ingredients

4 apples of your choice (Crispin or Golden Delicious are recommended)

1/2 cup granulated sugar

2 tablespoons lemon juice

1/2 teaspoon cinnamon

Cheddar Crust and Crumble

11/2 cups large-flake rolled oats

1 cup all-purpose flour

2/3 cup packed brown sugar

1/4 teaspoon salt

3/4 cup butter, melted

1 cup shredded extra-old Cheddar cheese

Method

1. Grease or line a 9-inch square metal or glass cake pan with parchment paper and set aside.

Cheddar Crust Crumble

2. In a bowl, whisk together oats, flour, brown sugar and salt.  With a fork, stir in butter until mixture clumps and is crumbly.  Add cheese, tossing to mix.  Press all but 1 cup evenly into the prepared pan.  Bake in centre of a 350 degree oven until the edges are golden, about 15 minutes.  Let cool.

3. Meanwhile, peel, core and cut apples into 1/2-inch  thick slices.  In a skillet or shallow saucepan, bring the apples, sugar, lemon juice and cinnamon to a boil, adding up to 1/4 cup of water if the apples stick to the pan.  Reduce heat and simmer, stirring occasionally, until tender-crisp, about 5 minutes.

4. Spread apple mixture over the base; sprinkle with remaining oat mixture.  Bake in centre of 350 degree oven until golden, about 30 minutes.  Let cool in pan on rack.

5. Cut into squares.

These squares can be made-ahead wrapped well in the refrigerator for up to 3 days or freeze for up to 2 weeks.

Read Full Post »

June, Sweet June

It seems there’s no surer way to make it rain than to pull out the swather and start cutting hay. Today it only took 20 minutes.

It was just a shower really but it was enough to shut things down for a while.  It won’t be long though since the winds are up and it’ll be time to try again.

Once spring seeding is over and done there’s usually never a moment to spare before the hay needs cutting and baling.  This year has been different though.  With such an early start due to the drier than normal spring weather, it hasn’t been the breakneck pace that it usually is.


But the beginning of hay season is just hours away and that means that things are about to get busy around here.

As the pace picks up, there’s always a temptation to skip meals but that never ends up being a good thing because hungry workers can quickly turn into tired and cranky workers who don’t realize that they need to take a moment to stop and eat. Things run a lot better when there’s fuel in the tank and I learned a long time ago, that having good food readily available on a busy farm is as important as oil is to a humming engine.


Some days can be long, dirty and hot, especially if equipment breaks down and the guys are trying to beat impending rains or bad weather. Though they never stop for long, when they do, I like to make sure I’ve got something that will keep them thinking and alert so they can focus on the task at hand.


At times like these, homemade muffins are a regular staple at our house and I love incorporating the goodness of fruits and vegetables into them every chance I get. These pineapple carrot muffins are a favourite and I love them because it allows me to indulge in both the fruit (the crushed pineapple) and the veggie (the shredded carrots).  A touch of cinnamon really compliments the sweetness and blends the satisfying flavours for a delicious snack.  I have these on the counter in the morning and pack them in lunch bags destined for distant fields in the afternoon.

The good thing is, you don’t have to drive a tractor or work in a field to love them, I love them too!

Carrot Pineapple Muffins

1 1/2 cups flour

1 cup sugar

1 tsp baking powder

1 tsp baking soda

1/2 tsp cinnamon

1/2 tsp salt

2/3 cup salad oil

2 eggs

1 cup finely grated raw carrot

1/2 cup crushed pineapple with juice

1 tsp vanilla

1. Mix dry ingredients together in a large bowl.

2.Combine wet ingredients in a separate bowl.

3. Add wet ingredients to the dry ingredients.  Blend on low-speed until  just moist.  Half fill greased muffin tins or paper liners and bake at 350 degrees F  for 20-25 minutes.

Delicious, satisfying goodness the whole family will love!

Read Full Post »